SPF (Sender Policy Framework) is a critical tool for email authentication. It ensures only authorized servers can send emails on your domain's behalf, reducing the risk of phishing and spoofing. If you're using Google Workspace or Microsoft 365, setting up SPF correctly is essential for better email deliverability and domain protection.
v=spf1 include:_spf.google.com ~all to authorize Google's mail servers.v=spf1 include:spf.protection.outlook.com -all for Microsoft’s servers.v=spf1 include:_spf.google.com include:spf.protection.outlook.com ~all.SPF is just one part of email authentication. Pair it with DKIM and DMARC for stronger protection and better inbox placement. Misconfigurations can lead to email delivery issues, so test thoroughly and update records carefully.
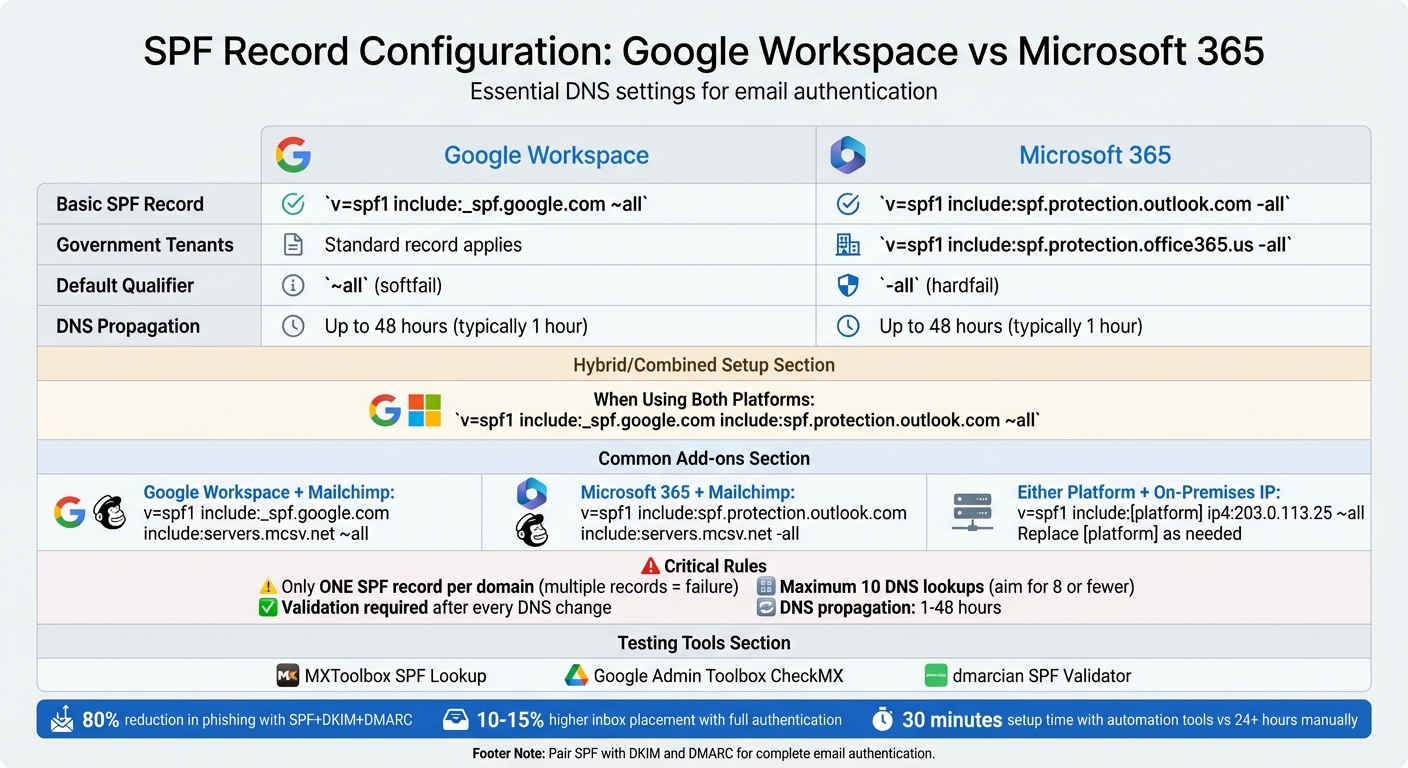
SPF Record Configuration Guide for Google Workspace vs Microsoft 365

Before diving into DNS settings, it’s crucial to map out a solid plan. An SPF record outlines every system authorized to send emails on your domain’s behalf while adhering to technical limits. Skipping this step can lead to authentication issues. Start by compiling a thorough list of all email sources to avoid missing anything.
The first step is to inventory every service that sends emails using your domain. Google emphasizes the importance of identifying all servers and services acting on behalf of your organization, including third-party providers. This goes beyond just Google Workspace or Microsoft 365 - everything needs to be accounted for.
Your list should include:
For larger organizations, platforms like Primeforge can simplify this process by centralizing sending infrastructure and automating DNS setup for Google Workspace and Microsoft 365 mailboxes.
To create your inventory, export sending sources from your Google Workspace and Microsoft 365 admin centers, review DNS records (MX, SPF, and A records), and consult your marketing, sales, and IT teams. Record details like sender type, domain, and whether the sender operates under the primary domain or a subdomain (e.g., outreach.example.com). Establish a change management process to ensure new tools are added to your SPF inventory before they go live, avoiding unexpected SPF issues.
Once your list is complete, you can design an SPF record that accurately reflects your email infrastructure.
An SPF record is a DNS TXT entry that starts with "v=spf1", lists authorized senders, and ends with a qualifier (e.g., "~all" or "-all").
Here are the most common mechanisms:
_spf.google.com for Google Workspace or spf.protection.outlook.com for Microsoft 365).The qualifier at the end determines enforcement strength. The "~all" (softfail) setting flags unauthorized senders as suspicious but doesn’t reject them outright. This is helpful during initial deployment or while monitoring changes. On the other hand, "-all" (hardfail) rejects any sender not explicitly listed. Many organizations in the U.S. start with softfail, review logs and DMARC reports for a few weeks, and then tighten the policy for critical domains.
Here are some typical SPF scenarios:
| Scenario | SPF Record Example | Planning Notes |
|---|---|---|
| Google Workspace only | v=spf1 include:_spf.google.com ~all |
Standard setup for a single platform |
| Microsoft 365 only | v=spf1 include:spf.protection.outlook.com -all |
Standard setup for a single platform |
| Both platforms (migration/hybrid) | v=spf1 include:_spf.google.com include:spf.protection.outlook.com ~all |
Combine includes for hybrid environments |
| Google Workspace + Mailchimp | v=spf1 include:_spf.google.com include:servers.mcsv.net ~all |
Add third-party includes sequentially |
| Google Workspace + on-prem relay | v=spf1 include:_spf.google.com ip4:193.22.100.7/30 ~all |
Use ip4: for fixed infrastructure to reduce lookups |
Keep in mind, your domain can only have ONE SPF TXT record. Having multiple records will cause SPF validation to fail. If you’re using both Google Workspace and Microsoft 365 on the same domain, combine their includes into a single record.
SPF records are subject to a limit of 10 DNS lookups for mechanisms like include, a, mx, ptr, and exists. Exceeding this limit results in a permanent error, which many email receivers interpret as a failed SPF check. This can be a challenge in complex setups with multiple platforms, email providers, and security gateways.
To avoid exceeding the limit, use validation tools like MXToolbox SPF Lookup or the Google Admin Toolbox to count effective lookups. Aim for eight or fewer lookups to leave room for future changes by your providers.
Here’s how to optimize your SPF record:
news.example.com or outreach.example.com with their own SPF records.Once you've planned your setup, the next step is to configure your SPF record for Google Workspace. Remember, this needs to be done at your DNS provider - not in the Google Admin console. Even a small typo can lead to authentication failures and email deliverability issues.
Start by logging into your DNS provider's control panel - whether that's GoDaddy, Cloudflare, Namecheap, or another service. Navigate to the DNS management section. Before adding a new SPF record, check if one already exists. A domain can only have one SPF TXT record. If you add multiple records, SPF checks will fail.
If no SPF record exists, create a new TXT record with the following settings:
@ (representing your root domain).v=spf1 include:_spf.google.com ~all.If an SPF record already exists, modify it by adding include:_spf.google.com to the existing mechanisms, ensuring everything stays in a single record.
The include:_spf.google.com mechanism allows Google’s outbound mail servers to send emails on behalf of your domain. The ~all qualifier takes a softfail approach - marking unauthorized senders as suspicious rather than outright rejecting them. This is a safer choice while you're monitoring results.
Once you save your changes, DNS propagation usually completes within an hour, though it can take up to 48 hours. For organizations managing multiple Google Workspace domains, tools like Primeforge can simplify the process. They automate bulk DNS updates and reduce setup times to about 30 minutes, minimizing the risk of manual errors.
Next, let’s explore how to adapt your SPF record for additional email services.
The structure of your SPF record depends on whether other services send email from your domain. For domains exclusively using Google Workspace, the basic record v=spf1 include:_spf.google.com ~all is sufficient. This setup works well for small businesses or teams relying solely on Google for email.
If you're using additional services, like Mailchimp, you'll need to combine their SPF mechanisms into a single record. For example:
v=spf1 include:_spf.google.com include:servers.mcsv.net ~allThe same approach applies to other email service providers (ESPs). For instance, if you're using SendGrid, you'd include include:sendgrid.net. Always check the specific SPF syntax in each provider’s documentation.
For those using an on-premises SMTP relay or dedicated IPs for specific tasks like cold outreach, you can add them with the ip4: mechanism. Here's an example:
v=spf1 include:_spf.google.com ip4:203.0.113.25 ~allThis method reduces DNS lookups compared to adding more include mechanisms, helping you stay within the 10-lookup limit. For more complex setups, consider delegating high-volume services to subdomains with their own SPF records.
After making changes to your DNS settings, it’s crucial to verify your setup. Tools like the Google Admin Toolbox CheckMX can confirm your SPF syntax and ensure _spf.google.com is included in the record. Other reliable options include MXToolbox SPF Lookup and dmarcian SPF Validator. These tools help identify common issues, such as multiple SPF records, excessive DNS lookups, or syntax errors.
To test functionality, send an email from your Google Workspace account to an external address (e.g., Gmail). Open the received email, view the full headers, and locate the Authentication-Results section. You should see spf=pass with a reference to _spf.google.com. If you see spf=fail or spf=none, review your record for typos, multiple entries, or propagation delays.
It’s a good idea to run these validation checks after every DNS update and periodically as part of email maintenance. If you're using the ~all qualifier, monitor email headers and DMARC reports for a few weeks. Once you're confident all legitimate emails pass SPF checks, you might tighten the policy to -all for stricter enforcement. However, many organizations in the U.S. stick with the softfail approach to avoid accidental email blocks.
Next, we’ll dive into SPF configuration for Microsoft 365, including hybrid setups where both platforms are in use.
To set up SPF (Sender Policy Framework) for Microsoft 365, you'll need to create a DNS TXT record using Microsoft's specific SPF parameters. Since Microsoft 365 doesn’t manage external DNS records, you'll need to work with your DNS provider, such as GoDaddy, Cloudflare, or another registrar.
For most Microsoft 365 tenants, the standard SPF record is:
v=spf1 include:spf.protection.outlook.com -all
This record allows Microsoft’s Exchange Online Protection to send emails on your domain’s behalf while instructing receiving servers to reject messages from unauthorized sources.
To set this up, log into your DNS management dashboard. If your domain doesn’t already have an SPF record, create a TXT record with the following settings:
@v=spf1 include:spf.protection.outlook.com -allFor U.S. government tenants, such as GCC High or DoD, Microsoft uses a different infrastructure. In this case, the SPF record should be:
v=spf1 include:spf.protection.office365.us -all
If you’re using additional email services, you’ll need to combine them into a single SPF record. For instance, if you use both Microsoft 365 and Mailchimp, your SPF record would look like this:
v=spf1 include:spf.protection.outlook.com include:servers.mcsv.net -all
For on-premises SMTP relays or specific IPs, you can include them with the ip4: mechanism. For example:
v=spf1 include:spf.protection.outlook.com ip4:198.51.100.10 -all
This setup minimizes DNS lookups, which is important since SPF records are limited to 10 lookups. Note that DNS propagation typically takes about an hour.
Organizations managing multiple Microsoft 365 domains can simplify this process with tools like Primeforge, which automates DNS configurations for platforms like Microsoft 365 and Google Workspace. This can significantly reduce setup time, sometimes from over 24 hours to just 30 minutes.
If you’re operating in a hybrid environment - such as using both Microsoft 365 and on-premises Exchange or migrating between platforms - SPF records require extra attention. For example, during a staged migration from Google Workspace to Microsoft 365, your SPF record should authorize both providers. A combined record might look like this:
v=spf1 include:_spf.google.com include:spf.protection.outlook.com ~all
The ~all qualifier (softfail) marks unauthorized senders as suspicious without outright rejecting them, which can be useful during transitions.
In a hybrid setup with Microsoft 365 and on-premises Exchange, your SPF record should include both the Microsoft 365 mechanism and your on-premises server IPs. For example:
v=spf1 include:spf.protection.outlook.com ip4:198.51.100.10 ip4:198.51.100.11 -all
Make sure to include all active sender IPs during the migration. Once you’ve fully transitioned to Microsoft 365, you can remove the on-premises IPs from the record.
Avoid creating multiple SPF records for different platforms, as this will cause immediate SPF failures. Also, don’t remove a provider’s include mechanism prematurely during migrations, as this can lead to email delivery issues. To stay within the 10-lookup limit, consider consolidating IP ranges using CIDR notation or assigning subdomains with their own SPF records for high-volume services.
After publishing your SPF record, it’s crucial to verify its accuracy. Tools like MXToolbox can help ensure:
Send test emails from your Microsoft 365 account to external addresses (e.g., Gmail or Outlook.com). Check the email headers for the 'Received-SPF' line to confirm that SPF is passing and references spf.protection.outlook.com. If you encounter issues like spf=fail or spf=none, double-check for typos, multiple records, or delays in DNS propagation.
Microsoft 365 Defender and the Exchange admin center also provide tools to monitor SPF performance, including message trace reports showing pass/fail trends. Once all legitimate senders pass SPF checks, consider tightening your policy from ~all (softfail) to -all (fail) for stronger spoofing protection. However, many organizations stick with ~all during infrastructure changes to avoid blocking legitimate emails.
For businesses running cold outreach campaigns or managing high email volumes, specialized services like Primeforge can handle SPF, DKIM, and DMARC configurations. As Dominique W. shared:
"Primeforge takes care of all the technical deliverability details - SPF, DKIM, DMARC, domain warm-up, and DNS records - without me needing to touch anything."
Up next: SPF optimization for large organizations and high-volume outreach.
When managing SPF records at scale, some mistakes can have serious consequences. The most common issues include exceeding the 10 DNS lookup limit, creating multiple SPF TXT records for the same domain, and relying on permissive mechanisms like +a, +mx, or +ptr. For example, if you’re using multiple tools - Google Workspace, Microsoft 365, a CRM, a marketing platform, and a warm-up service - you might end up stacking too many include statements. This can cause SPF to fail, leading to emails being flagged as spam or outright rejected by Gmail and Microsoft 365. For cold outreach teams, this means lower response rates and more time spent troubleshooting.
Another frequent misstep is leaving old vendor include statements in your SPF record after switching tools, or using qualifiers like ?all or +all instead of the stricter ~all or -all. These errors open the door for unauthorized senders to impersonate your domain, damaging your reputation with receiving servers. If your outreach setup includes sequencing tools, tracking domains, or warm-up services on top of platforms like Google Workspace or Microsoft 365, it’s critical to consolidate your SPF requirements into a single TXT record and remove unused entries. This not only simplifies management but also improves your domain’s trustworthiness.
By addressing these pitfalls, you can maintain a reliable SPF record even as your email infrastructure grows.
To avoid hitting the 10-lookup limit, start by mapping out all your sending sources - this includes Google Workspace (_spf.google.com), Microsoft 365 (spf.protection.outlook.com), CRM/ESP tools, on-premises IPs, and any third-party services. Instead of relying on a or mx mechanisms, use direct ip4/ip6 entries wherever possible. Avoid nested include chains, as they quickly eat into your lookup budget. For more complex setups, consider assigning high-volume or experimental email traffic to subdomains like outreach.example.com or promos.example.com. Each subdomain can have its own SPF, DKIM, and DMARC policies, which keeps your primary domain clean and allows for tighter control over specific traffic types.
If your organization frequently adds or changes email vendors, maintaining a centralized inventory of all sending systems is essential. This inventory should include system owners and decommission dates, and any changes should follow a checklist that includes updates to SPF, DKIM, and DMARC settings. Tools like Primeforge can streamline this process by automating bulk DNS updates and offering templates for subdomains. With these tools, what might take over 24 hours manually can be done in just 30 minutes, reducing errors and ensuring your SPF setup stays within limits as your infrastructure evolves.
These strategies not only help manage SPF effectively but also pave the way for integrating it with DKIM and DMARC for better email deliverability.
Relying solely on SPF isn’t enough for cold outreach campaigns. While SPF confirms that a sending IP is authorized, it doesn’t verify the integrity of the message or account for email forwarding. This is where DKIM and DMARC come into play. DKIM adds a cryptographic signature to your emails, allowing recipients to verify that the message hasn’t been altered during transit. DMARC, on the other hand, instructs receiving servers on how to handle authentication failures and ensures that either SPF or DKIM aligns with the visible From domain.
For cold outreach, using all three protocols - SPF, DKIM, and DMARC - can significantly boost your credibility with providers like Gmail and Outlook. Start with a DMARC policy set to p=none to gather reports, and gradually move to stricter settings like quarantine or reject. Properly configured domains with SPF, DKIM, and DMARC often see 10–15% higher inbox placement rates compared to SPF-only setups. Additionally, these measures can cut down spam and phishing incidents by up to 80%.
Platforms like Primeforge simplify this process by integrating SPF, DKIM, and DMARC management into a single ecosystem. With tools like Salesforge for outreach, Warmforge for warm-up and deliverability, and Infraforge for private infrastructure, you can centralize your email authentication setup. This not only speeds up troubleshooting but also ensures alignment across all domains and subdomains as your email volume and organizational complexity grow.
Setting up SPF records for Google Workspace and Microsoft 365 is a critical step to ensure secure and dependable email delivery. Start by identifying all authorized senders, then create a single, accurate TXT record. Use tools like MXToolbox to validate your setup. This approach helps prevent domain spoofing and keeps your emails out of spam folders. Skipping these steps or creating multiple SPF records can lead to authentication issues that block your emails entirely. A well-structured SPF record is key to smooth email delivery.
To verify your setup, tools like the Google Admin Toolbox or checking email headers for "spf=pass" can be helpful. Keep in mind that DNS changes can take up to 48 hours to propagate. Pairing SPF with DKIM and DMARC significantly improves deliverability and can cut phishing risks by up to 80%. For teams handling cold outreach across multiple domains and mailboxes, this combination is indispensable.
Managing DNS settings manually can be tedious and error-prone. Automated solutions like Primeforge simplify the process, cutting setup time to about 30 minutes while reducing the chance of mistakes.
"Primeforge takes care of all the technical deliverability details - SPF, DKIM, DMARC, domain warm-up, and DNS records - without me needing to touch anything. The mailboxes come pre-configured with US-based IPs, which gives a strong deliverability baseline right out of the gate." - Dominique W.
Whether you're managing a single domain or running large-scale campaigns, careful planning, thorough testing, and continuous optimization are essential. Your domain's reputation and the success of your email outreach rely on getting these details right.
To set up an SPF record that supports both Google Workspace and Microsoft 365, you can merge their SPF mechanisms into one record. Here's an example: v=spf1 include:_spf.google.com include:spf.protection.outlook.com -all. This setup helps authenticate emails from both platforms, minimizing the chances of delivery problems.
Don't forget to update your DNS settings with this combined SPF record. If you're managing several domains or workspaces, tools like Primeforge can make the process easier by offering features like automated DNS configuration and bulk updates, saving you both time and hassle.
To verify your SPF record setup, try tools like MXToolbox, Google Admin Toolbox CheckMX, or DNSChecker. These tools make it simple to confirm that your SPF record is correctly configured, helping to ensure your emails are properly authenticated.
If you're working with Primeforge, it offers automated DNS setup, streamlining SPF record management for both Google Workspace and Microsoft 365 mailboxes.
To work within the 10 DNS lookup limit for SPF records, it's key to combine mechanisms wisely. Use the "include" directive to streamline entries, and minimize reliance on mechanisms like "a", "mx", and "ptr", as each contributes to the lookup count.
You can also explore SPF flattening tools or services like Primeforge's automated DNS setup. These options simplify SPF record management and help you optimize your configuration. Regularly reviewing your SPF record ensures it remains efficient and compliant, supporting effective email authentication.
