DMARC (Domain-based Message Authentication, Reporting, and Conformance) is a protocol designed to protect your email domain from spoofing and phishing. It works by verifying that emails sent from your domain align with SPF (Sender Policy Framework) and DKIM (DomainKeys Identified Mail) standards. Setting up DMARC improves email deliverability, protects your brand reputation, and provides insights into email activity through detailed reports.
Key Steps to Set Up DMARC:
p=none policy to monitor email activity without blocking messages.p=none to stricter policies like p=quarantine and p=reject over time.For businesses managing multiple domains or email services, tools like Primeforge automate SPF, DKIM, and DMARC setup, saving time and reducing errors. DMARC is essential for safeguarding your emails while ensuring they land in recipients' inboxes.
When setting up DMARC, you have three policy options to decide how to handle emails that fail authentication. The first option, p=none, is essentially a monitoring mode. It logs authentication failures but doesn’t block email delivery, making it the ideal starting point when you’re implementing DMARC for the first time. The p=quarantine option flags emails that fail authentication as suspicious and typically sends them to spam or junk folders. Finally, p=reject takes the strictest approach, outright blocking emails that fail authentication checks.
To fine-tune your implementation, you can use the pct parameter and the sp tag. For instance, setting pct=20 applies your policy to only 20% of failing emails, giving you room to test stricter enforcement gradually. The sp tag allows you to set a separate policy for subdomains. This is handy if you want to enforce a strict p=reject policy on your primary domain while applying a more lenient policy, like quarantine, to subdomains used for marketing or outreach campaigns.
Another key aspect to consider is alignment settings, controlled by the aspf and adkim tags. These can be set to relaxed (r) or strict (s). Relaxed alignment allows subdomains (like mail.yourdomain.com) to align with the main domain (yourdomain.com), while strict alignment requires an exact match. For businesses in the U.S., starting with relaxed alignment for both SPF and DKIM is often a practical choice, as many platforms rely on subdomains or custom sending domains.
Before you proceed, it’s crucial to create a complete inventory of all email sources to ensure no legitimate sender is left unaccounted for.
Start by documenting every system that sends email from your domain. A good first step is reviewing your SPF records in your DNS settings. Look at the IP addresses and any "include" statements (like include:sendgrid.net) that authorize third-party services. Additionally, check your Google Workspace or Microsoft 365 admin console to identify apps and delegated senders configured to send emails on your behalf.
You’ll also need to compile a list of third-party platforms that send emails for your domain. This might include your CRM, marketing automation tools, helpdesk software, billing systems, and cold outreach platforms. Don’t overlook less obvious sources, like office printers that email scanned documents or legacy applications that send status updates. These “shadow IT” systems can often be missed during initial reviews. When you implement a p=none policy and start receiving DMARC reports, you may uncover additional sources you hadn’t accounted for.
Once you’ve documented all your senders, you’ll be ready to choose an initial DMARC policy.
It’s best to start with a p=none policy while monitoring aggregate DMARC reports. During this phase, confirm that all platforms sending emails on your behalf are signing their messages with DKIM and aligning with SPF.
When your reports show that 98–99% of legitimate email traffic is consistently passing DMARC, you can move to a p=quarantine policy. Start cautiously by setting the pct value to 10–25, which applies enforcement to a small portion of your email traffic. Monitor performance over several weeks, particularly during periods of high activity like marketing campaigns or outreach efforts. Once you’re confident in the stability of your pass rates, you can gradually increase the enforcement percentage and eventually transition to p=reject for full protection. For domains used exclusively for cold outreach, you may want to stick with quarantine longer, especially if you’re frequently testing new tools or senders.
To implement DMARC effectively, you need properly configured SPF and DKIM records. These two protocols are essential because at least one must pass and align with your visible From: address for DMARC to work.
For Google Workspace, update your DNS TXT record for "@" with the following:
v=spf1 include:_spf.google.com ~all
Next, go to the Google Admin console and navigate to: Apps → Google Workspace → Gmail → Authenticate email.
google._domainkey.yourdomain.com) to your DNS.For Microsoft 365, add this TXT record to your DNS:
v=spf1 include:spf.protection.outlook.com -all
Then, in the Microsoft 365 Defender portal, go to: Email & collaboration → Policies & rules → Threat policies → DKIM.
selector1._domainkey.yourdomain.com to something like selector1-yourdomain-com._domainkey.<initialdomain>.onmicrosoft.com.For third-party services like SendGrid or Mailgun, you’ll need to include their SPF mechanism and follow their specific DKIM setup instructions.
v=spf1 include:_spf.google.com include:sendgrid.net ~alls1._domainkey.yourdomain.com and s2._domainkey.yourdomain.com.
include:mailgun.org for SPF, and add a TXT record with a selector like krs._domainkey.yourdomain.com.
Always follow the exact DNS setup instructions provided by your service and confirm that test emails pass both SPF and DKIM checks.
SPF records come with a limit: they can’t include more than 10 DNS lookup mechanisms (like include, a, mx, or redirect) in a single check. If you exceed this limit, receiving servers treat the SPF check as a permanent error, which can hurt your email deliverability.
This problem is common when you use multiple services - like Google Workspace or Microsoft 365 - alongside marketing, CRM, or outreach platforms, each adding its own include mechanism.
To avoid hitting this limit:
Another option is SPF flattening, which resolves all include mechanisms into a list of IP address ranges and publishes a simplified record with only ip4 or ip6 entries. However, flattened records can get lengthy and may become outdated if a provider changes its IP ranges. To address this, use automation tools that regenerate your SPF record periodically.

Primeforge simplifies this entire process with automated DNS management. For cold outreach operations, it handles SPF, DKIM, DMARC, and custom domain tracking as part of its mailbox provisioning for both Google Workspace and Microsoft 365. This eliminates the need for manual DNS configuration, saving time and reducing errors.
At just $4.50 per mailbox per month, Primeforge offers a hands-off solution that includes domain warm-up and DNS record management.
"What stands out is how hands-off the setup is. Primeforge takes care of all the technical deliverability details - SPF, DKIM, DMARC, domain warm-up, and DNS records - without me needing to touch anything." - Dominique W.
Primeforge also supports bulk DNS updates, making it a great option for teams managing dozens or even hundreds of domains. This level of automation sets Primeforge apart from other mailbox resellers, many of which only offer semi-automated configurations.
DMARC Policy Enforcement Timeline: 10-Week Rollout Schedule
Setting up a DMARC record involves adding a TXT record to your DNS at the host _dmarc.yourdomain.com. To get started, log in to your DNS management panel and locate the DNS settings for your domain.
Here’s what to include in your new TXT record:
_dmarc (most providers automatically append your domain, resulting in _dmarc.yourdomain.com)For a cold email domain in monitoring mode, you might use a record like this:
v=DMARC1; p=none; rua=mailto:[email protected]; ruf=mailto:[email protected]; fo=1; pct=100; aspf=r; adkim=r
This setup tells servers to use DMARC version 1 in monitoring mode (p=none). It also specifies where to send aggregate reports (rua) and forensic reports (ruf). The fo=1 tag requests reports for any authentication failures, while aspf=r and adkim=r indicate relaxed alignment for SPF and DKIM. Finally, pct=100 applies the policy to all emails.
Key Reminder: Only one DMARC record should exist per domain. If multiple TXT records are created at _dmarc, the policy may be ignored entirely. Once you’ve saved your changes, use an online DMARC checker tool to confirm the record is correctly formatted and has propagated.
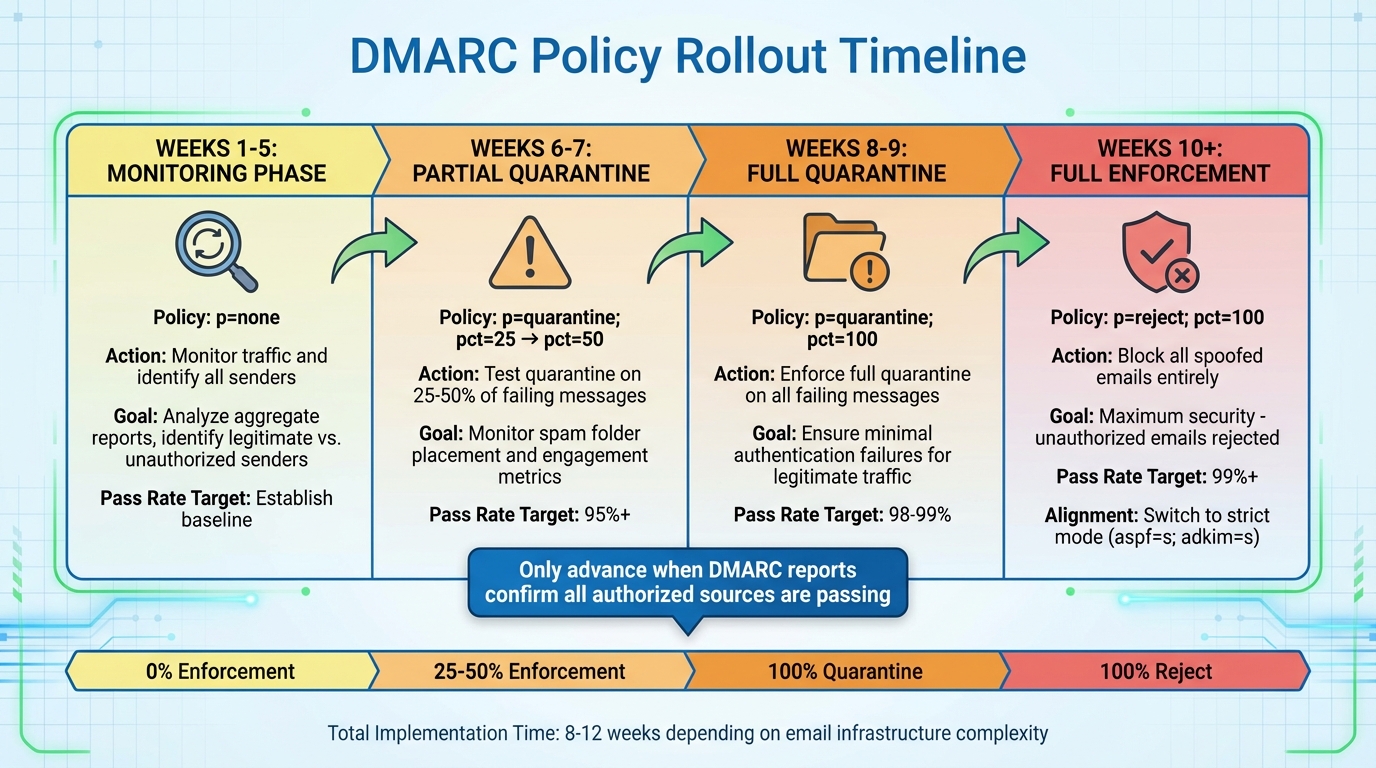
After publishing your DMARC record, the next step is to gradually enforce stricter policies. Transitioning from monitoring to full enforcement typically takes 8–12 weeks, depending on the complexity of your email setup. Start with p=none for two weeks while reviewing aggregate reports. Use this time to identify and fix any legitimate senders failing SPF or DKIM checks.
Weeks 3–5: Continue monitoring with p=none while analyzing reports. Ensure all known senders pass and align properly. Investigate any unknown IPs sending mail under your domain.
Weeks 6–7: Shift to partial quarantine with p=quarantine; pct=25, then increase to pct=50. Keep an eye on spam-folder placements and engagement metrics. If reports show consistent success, move to full quarantine with pct=100.
Weeks 8–9: Maintain p=quarantine; pct=100 until you see minimal authentication failures for legitimate traffic.
Weeks 10+: Begin enforcing p=reject; pct=25, gradually increasing to 50 and eventually 100. Only advance when DMARC reports confirm that all authorized sources are passing. At this stage, spoofed emails will be blocked entirely, providing maximum security.
Here’s a timeline to guide your rollout:
| Week | DMARC Record | Purpose |
|---|---|---|
| 1–5 | v=DMARC1; p=none; rua=mailto:[email protected]; fo=1; aspf=r; adkim=r |
Monitor traffic and identify senders |
| 6–7 | v=DMARC1; p=quarantine; pct=25; rua=mailto:[email protected]; fo=1; aspf=r; adkim=r |
Test quarantine on 25% of messages |
| 8–9 | v=DMARC1; p=quarantine; pct=100; rua=mailto:[email protected]; fo=1; aspf=r; adkim=r |
Enforce full quarantine |
| 10+ | v=DMARC1; p=reject; pct=100; rua=mailto:[email protected]; fo=1; aspf=s; adkim=s |
Block spoofed emails with strict alignment |
Managing DMARC policies can be tedious, especially if you handle multiple domains. That’s where Primeforge comes in, offering automated DMARC management to simplify the process. The platform handles everything from creating and deploying DMARC records to configuring SPF, DKIM, and custom domain tracking - saving you time and ensuring compliance with best practices.
If you’re managing several domains, Primeforge’s bulk DNS update feature is a game-changer. It allows you to deploy or modify DMARC records across your entire infrastructure from a single dashboard. This is particularly helpful during the enforcement phase, as you may need to tweak policy tags based on aggregate report insights.
"Yes, Primeforge offers automatic setup of all the technical parameters such as DKIM, DMARC and SPF in accordance with industry best practices."
- Primeforge
Once your DMARC record is active, you’ll start receiving two types of reports at the email addresses you designated: aggregate reports (RUA) and forensic reports (RUF). Aggregate reports summarize daily authentication results for all your email traffic, including pass/fail counts for SPF and DKIM, sender IP addresses, and alignment statistics. Forensic reports, on the other hand, provide detailed information on individual emails that failed DMARC checks, including full headers and reasons for rejection.
These reports are delivered in XML format, which can be challenging to interpret manually. Tools like MxToolbox, DMARCian, or EasyDMARC can help by converting the data into visual summaries. To keep things organized, consider setting up a dedicated mailbox for these reports. If you’re using Google Workspace, creating a group email can make it easier for your team to access and collaborate on the data. These insights will help you identify and address authentication issues effectively.
DMARC reports are your roadmap to fixing authentication problems. Common issues include:
Look for failure tags in your reports, such as "spf=fail", "dkim=fail", or "policy_evaluated=applied", to pinpoint where the problems lie.
To fix SPF alignment issues, check your reports for failing IP addresses or sources. If a legitimate service like SendGrid or Mailchimp isn’t passing, update your SPF record by adding the appropriate include statement (e.g., include:sendgrid.net). Be mindful of the 10-DNS-lookup limit for SPF records to avoid exceeding it.
For DKIM failures, you may need to regenerate your DKIM key and update the corresponding TXT record in your DNS. Make sure DKIM signing is enabled in your platform settings. Test the changes by sending emails and verifying that they pass authentication. Alignment issues often resolve when your From: domain matches your envelope-from domain or when you switch to relaxed mode (adkim=r).
Once you’ve addressed these issues, continue monitoring your metrics and gradually strengthen your DMARC policy.
After your initial DMARC setup, focus on achieving strong metrics: aim for a pass rate above 95% for legitimate emails, a failure rate below 1%, and at least 90% alignment compliance for both SPF and DKIM.
During the first month, review your DMARC data weekly. Once your setup stabilizes, you can switch to monthly reviews. When legitimate failures consistently drop below 1% and all authorized sources are passing, you can increase your enforcement level. This could mean raising the enforcement percentage or moving from a "p=quarantine" policy to "p=reject." Tools like DMARCian can notify you of significant drops in pass rates, allowing you to address issues before they impact email deliverability.
For organizations managing multiple domains, automation tools can simplify the process. For example, Primeforge can handle bulk DNS updates, making it easier to adjust policies and maintain alignment for SPF, DKIM, and DMARC records as your infrastructure evolves.
While DMARC helps authenticate your domain, it doesn’t shield you from every type of email threat. Attacks like phishing from non-spoofed sources, business email compromise (BEC), and malware require additional defenses. That’s where inbound security tools in platforms like Google Workspace and Microsoft 365 come into play.
In Google Workspace, you can strengthen your email security by enabling features like "Help prevent spoofing, phishing, and spam" in the Admin console. Take it a step further by activating advanced protections such as attachment scanning, link protection, and spoofing defenses. These tools work hand-in-hand with DMARC, using its results while adding layers of scrutiny for suspicious patterns, display-name spoofing, and lookalike domains.
For Microsoft 365, setting up anti-phishing policies in Defender for Office 365 is crucial. Enable impersonation protection for executives and key domains, and turn on safe links and safe attachments to scan URLs and files in real time. These features can quarantine or reject messages that fail DMARC, while still allowing administrators to review potential false positives.
By combining proper SPF, DKIM, and DMARC configuration with inbound filters, sandboxing, and user training, you create a defense-in-depth strategy. This approach protects your brand’s reputation, ensures email deliverability, and minimizes the risk of fraud. For U.S.-based businesses engaged in cold outreach, this layered strategy is especially important to prevent financial losses and avoid regulatory issues.
Once your inbound security is in place, adopting ongoing best practices will help you maintain a strong email security posture.
Staying ahead of email threats requires regular audits and proactive management. Start with a quarterly domain audit to identify all your owned domains, subdomains, and sending services. Ensure each one has accurate SPF, DKIM, and DMARC records in place. For new domains - whether for marketing, outreach, or transactional purposes - begin by setting up SPF and DKIM, and publish a DMARC record with p=none to monitor activity. Over time, analyze reports, resolve misaligned third-party services, and gradually move to stricter policies like p=quarantine and eventually p=reject.
Keep your DNS records tidy by removing outdated or unused SPF and DKIM entries. To stay within the SPF 10-lookup limit, consolidate third-party services and eliminate unnecessary include: mechanisms. For U.S. companies juggling multiple tools such as CRMs, marketing platforms, and cold email software, maintaining a documented inventory of all mail streams and conducting periodic SPF reviews can prevent silent failures in email delivery.
Other key practices include enforcing multi-factor authentication (MFA) on email accounts, implementing strong password policies, running simulated phishing tests to gauge user awareness, and regularly reviewing DMARC and security logs for unusual activity.
Primeforge offers tools to simplify many of these tasks, making it easier to maintain a robust email security strategy.
Primeforge takes the hassle out of DNS setup for Google Workspace and Microsoft 365 mailboxes. By automating the configuration of SPF, DKIM, and DMARC records, it reduces the chance of human error that could disrupt email authentication. This automation also supports continuous monitoring, ensuring your security settings remain effective over time.
Its U.S.-based IP addresses and features like bulk DNS updates and multiple workspaces allow teams to standardize authentication across numerous cold outreach domains. Primeforge’s integration with other tools in The Forge Stack - such as Salesforge, Mailforge, Warmforge, Infraforge, and Leadsforge - further streamlines deliverability monitoring and infrastructure management. This unified ecosystem helps align security controls with operational needs, enforce strict DMARC policies like p=reject, and maintain consistent authentication settings across your outbound email efforts.
Setting up and managing DMARC is a continuous process that requires careful planning and execution. Start by creating a DMARC record with a "p=none" policy to collect data. Use the insights from aggregate reports to identify misconfigurations or unauthorized senders. Over time, you can strengthen your policy, moving from "quarantine" to "reject" as you gain confidence in your email authentication setup. This method not only protects your domain from spoofing and phishing but also improves your sender reputation, which is crucial for cold outreach success.
For U.S.-based sales and outreach teams juggling multiple domains, it's essential to keep SPF and DKIM records updated whenever new tools are added. Regularly review DMARC reports - ideally on a weekly basis - to catch any issues early. Assigning a dedicated team member to this task can help ensure consistency. Additionally, prune unused senders from your SPF record to stay within the 10-lookup limit, and apply uniform DNS templates across all new domains to streamline management.
To simplify these ongoing tasks, Primeforge offers automation solutions for setting up SPF, DKIM, and DMARC, specifically tailored for Google Workspace and Microsoft 365 mailboxes used in cold outreach. By automating these processes, Primeforge eliminates the need for manual DNS updates, reducing the likelihood of errors and ensuring consistent authentication across multiple domains.
Primeforge also integrates tools like Salesforge and Warmforge to centralize email authentication and sending strategies. This makes it easier to enforce strict "p=reject" policies while protecting your brand and ensuring your emails land in recipients' inboxes. With this streamlined approach, your outreach efforts can remain effective and secure, even as your prospecting stack grows.
DMARC plays a key role in improving email deliverability by ensuring emails sent from your domain are verified as genuine. This helps reduce the risk of spoofing and phishing attacks, which in turn builds trust with email providers. As a result, your legitimate emails are more likely to land in your recipients' inboxes.
Beyond that, implementing DMARC gives you the ability to monitor any unauthorized use of your domain. This added layer of oversight helps you maintain better control over your email reputation and ensures smoother email delivery overall.
The p=none policy is like a watchful observer - it lets emails pass without enforcement, mainly to collect data on any unauthorized activity. On the other hand, the p=quarantine policy takes a more cautious approach, marking emails that fail DMARC authentication as suspicious and typically redirecting them to the spam or junk folder. The strictest of all, the p=reject policy, outright blocks emails that fail DMARC checks, ensuring they never reach the recipient.
Deciding which policy to implement depends on how well your domain's email authentication is set up and how prepared you are to apply stricter security measures. For businesses leveraging platforms like Google Workspace or Microsoft 365, tools such as Primeforge can streamline DNS and email authentication management, making it easier to strengthen your defenses.
Primeforge simplifies the process of setting up email security by automatically configuring DMARC, SPF, and DKIM records as part of your mailbox setup. This ensures your domain is safeguarded against spoofing attacks while adhering to recommended security standards.
By offering features like bulk DNS updates, Primeforge takes the complexity out of managing records. It saves you time, minimizes errors, and keeps your email infrastructure secure and compliant - without the headache of manual configurations.
