Microsoft 365 is a reliable platform for cold email campaigns, offering professional-grade email infrastructure, security, and trusted deliverability. Here's a quick breakdown of how to set up and optimize Microsoft 365 for cold outreach:
For faster setup and scaling, tools like Primeforge automate DNS configuration, warm-up processes, and bulk management, saving time and reducing errors.
Key Takeaway: Proper configuration, compliance, and monitoring are critical for successful cold email campaigns with Microsoft 365.

Microsoft 365 Cold Email Setup: Step-by-Step Configuration Guide
When selecting a Microsoft 365 plan for cold email outreach, it's essential to prioritize features like custom domain support, robust admin controls, and reliable authentication. Microsoft 365 Business Basic is a solid choice, offering key tools such as custom email addresses, Exchange Online, and full DNS configuration access - everything you need for effective email campaigns. On the other hand, plans like the Frontline F3 plan ($8.00 per user per month) come with limited storage and fewer features, making them less practical for cold emailing.
If you're managing multiple domains for outreach, it's wise to use separate tenants for each domain. This approach isolates sender reputation, ensuring that issues with one domain don’t spill over and affect others. Once you've chosen the right plan, you can move on to configuring your mailboxes and DNS settings for better email deliverability.
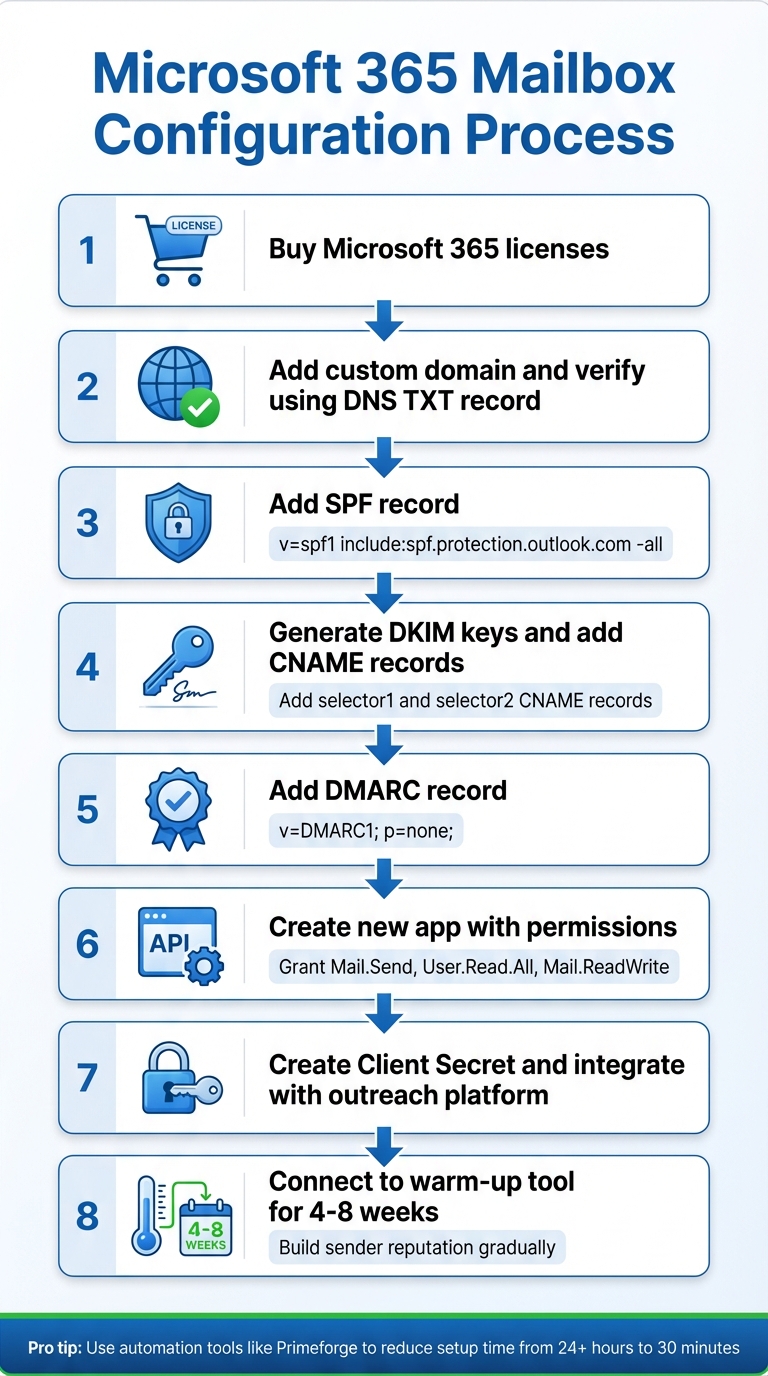
Here’s a quick breakdown of the setup process:
v=spf1 include:spf.protection.outlook.com -all.v=DMARC1; p=none;.Mail.Send, User.Read.All, and Mail.ReadWrite.Before starting your campaigns, connect each mailbox to a warm-up tool for 4 to 8 weeks. This gradual process helps establish your account as trustworthy in the eyes of email providers, improving your overall deliverability.
Once your mailboxes are configured, how you structure your domains can make a big difference in maintaining your sender reputation.
If your prospects use Microsoft 365, sending emails from Microsoft 365 mailboxes can give you an edge. This tactic, known as ESP Matching, often leads to better deliverability.
For those looking for a streamlined process, tools like Primeforge can simplify the setup. It offers pre-configured DNS records, US-based IP addresses, and bulk management features to get you up and running faster.
If you're running cold email campaigns through Microsoft 365, setting up proper DNS authentication is a must for ensuring your emails get delivered. Three key protocols - SPF (Sender Policy Framework), DKIM (DomainKeys Identified Mail), and DMARC (Domain-based Message Authentication, Reporting & Conformance) - play a vital role in this process.
These three protocols work together to protect your sender identity and meet the authentication standards of major email providers. Outlook.com, for example, started enforcing SPF, DKIM, and DMARC for high-volume senders as of May 5, 2025. Without these configurations, your emails are at serious risk of being flagged as spam or outright rejected. Here’s how to set everything up.
To get started, log in to your domain provider (like GoDaddy or Cloudflare) and add the necessary DNS entries:
@ and the following value:v=spf1 include:spf.protection.outlook.com -allselector1._domainkey pointing to selector1-[yourdomain-com]._domainkey.[yourdomain].onmicrosoft.comselector2._domainkey pointing to selector2-[yourdomain-com]._domainkey.[yourdomain].onmicrosoft.com_dmarc and the value:v=DMARC1; p=none; rua=mailto:[email protected]p=none policy to monitor activity before applying stricter rules.
Pro Tip: If your emails are landing in spam, it's often a misalignment issue that can usually be resolved in under an hour.
Manually setting up DNS records can be time-consuming - often taking over 24 hours per domain - and leaves room for errors. Tools like Primeforge can simplify this process. Primeforge automates DNS setup, cutting the time down to about 30 minutes, and includes built-in validation to catch mistakes. It also supports bulk operations across multiple domains, assigns US-based IP addresses optimized for cold outreach, and costs between $3.50 and $4.50 per mailbox - less expensive than standard Microsoft 365 plans. With a 4.7/5 rating from 125 reviews on Outreach Almanac, Primeforge is a great option for teams scaling their cold email efforts while avoiding technical headaches.
Microsoft 365 imposes specific sending limits to safeguard its system. Each mailbox is allowed to send up to 10,000 unique recipients per day, but there's a cap of 1,000 new (non-relationship) contacts daily. Additionally, the system restricts sending to 30 messages per minute. While these thresholds may seem generous, pushing them too hard can harm your sender reputation. A safer approach is to aim for 150–200 emails per day per mailbox to stay within a healthy range and avoid potential issues.
To operate effectively within these limits, gradually warming up your mailbox is key to maintaining a positive sender reputation.
When you start with a new Microsoft 365 mailbox, it lacks a sending history, which can make inbox providers wary. To build trust, it’s crucial to warm up the mailbox incrementally over 4–8 weeks. Begin by sending 10–20 emails per day during the first week and slowly increase to 50–100 emails daily, ensuring bounce rates and spam complaints remain low.
Tools like Warmforge, included free with any Salesforge subscription, can automate this warm-up process. By mimicking natural engagement patterns, these tools save time and help establish a strong sender reputation. This gradual approach not only builds credibility but also ensures your systems are ready for scaling larger outreach campaigns.
Once a mailbox has built a solid reputation, the next step is to scale by adding multiple domains. This strategy distributes your sending volume across several mailboxes, reducing the risk to your primary business email. If one domain encounters issues, your main brand remains secure.
Tools like Primeforge simplify this scaling process by offering features such as bulk DNS management and automated volume distribution. At a cost of $3.50–$4.50 per mailbox, it’s a budget-friendly option for teams looking to expand their cold email efforts. This multi-domain approach ensures your outreach remains scalable and compliant, while protecting your sender reputation for long-term success.
Cold emails must adhere to the CAN-SPAM Act of 2003, which imposes penalties of up to $53,088 per email for violations. To comply, ensure your emails have accurate "From", "To", and "Reply-To" headers, truthful subject lines that match the email content, and a valid physical address. Additionally, every email must include a clear opt-out option, and unsubscribe requests must be processed within 10 business days.
Even if you use a third-party service to manage your email campaigns, the legal responsibility for compliance remains yours. The Federal Trade Commission emphasizes:
The CAN-SPAM Act... establishes requirements for commercial messages, gives recipients the right to have you stop emailing them, and spells out tough penalties for violations.
To ensure compliance and protect your sender reputation, include your physical address in your email signature and make the opt-out link easy to find. Once compliance is in place, focus on securing your mailboxes and managing your sender reputation effectively.
Securing your mailboxes is essential, and Microsoft 365 provides tools to help. Start by enabling multi-factor authentication (MFA) and opting for app-based authentication instead of basic passwords. You can also enforce conditional access policies based on factors like location or device to add an extra layer of security.
Proper DNS authentication is equally important, especially for cold outreach. With 70% of inboxes relying on DMARC to verify sender identities, implementing this protocol can streamline the setup process. What once took days of manual configuration can now be completed in about 30 minutes.
A secure setup is just the beginning - actively monitoring your sender reputation is key to maintaining strong email deliverability. A solid authentication framework provides a good starting point, but ongoing monitoring of metrics like bounce rates, spam complaints, and engagement levels helps identify potential problems early.
Microsoft 365’s Security & Compliance Center includes built-in reporting tools that make it easier to track performance. For a broader perspective, consider integrating third-party monitoring services. Pay attention to open rates, unsubscribe trends, and overall engagement to quickly address any issues, ensuring your sender reputation stays intact over time.
Running a successful Microsoft 365 cold email campaign hinges on a few key elements: proper authentication, smart scaling, and consistent monitoring. At the heart of it all is your sender reputation - because if your emails don’t make it to the primary inbox, your campaign is essentially dead in the water.
Tools like Primeforge can drastically reduce the time it takes to set up DNS configurations, cutting it down from over 24 hours to just about 30 minutes. This speed is a game-changer when you’re juggling multiple domains and mailboxes at scale.
Make sure to configure SPF, DKIM, and DMARC to establish your sender credibility. Combine this with subdomain isolation - like using outreach.yourcompany.com - to safeguard your main corporate domain from the risks of blacklisting.
Keep a close eye on your metrics with tools such as Google Postmaster Tools and blacklist checkers. Aim to maintain hard bounce rates below 2% by keeping your email lists clean and updated. Monitor open rates, unsubscribe patterns, and engagement levels to catch and address potential issues early. By focusing on deliverability basics and respecting recipient preferences, you can build a Microsoft 365 cold email strategy that thrives over the long term.
To ensure your emails land in inboxes and not spam folders, start by authenticating your domain with SPF, DKIM, and DMARC. These protocols help verify your emails' legitimacy. Next, gradually warm up your mailbox by sending a manageable number of emails daily - around 50 to 100 is a good range. Stick to clean, engaged recipient lists to maintain a healthy sender reputation. Also, be mindful of Microsoft 365's sending limits, and steer clear of using spammy language or overloading your emails with links.
For a smoother process, you might want to try tools like Primeforge. This platform can handle DNS configuration, mailbox warm-up, and other optimizations specifically designed for cold email campaigns, saving you time and effort.
Warming up a new Microsoft 365 mailbox is a crucial step to ensure a strong sender reputation before diving into cold email campaigns. Start small - send just 3–10 emails daily with a fresh mailbox, and then slowly increase the volume by about 15–20% each day. Reaching your target sending volume typically takes anywhere from 4 to 8 weeks, so patience is key.
To avoid spam filters and prove your emails are legitimate, set up proper authentication records like SPF, DKIM, and DMARC. Also, keep Microsoft 365’s sending limits in mind - new mailboxes are generally capped at 50–100 emails per day. Focus on sending emails to engaged recipients, such as internal accounts or warm leads, to generate positive engagement signals that boost your reputation. Regularly track key metrics like bounce rates, spam complaints, and inbox placement to ensure your emails continue landing where they should.
For an easier and more efficient process, you might want to use an automation tool like Primeforge’s Warmforge. It can handle the ramp-up process, manage DNS settings, and provide real-time deliverability monitoring. A steady, well-monitored warm-up approach will help you build trust and improve inbox placement for your future campaigns.
SPF, DKIM, and DMARC are essential tools for making sure your emails are trusted and land where they’re supposed to - your recipients’ inboxes. Here’s how they work together:
These protocols not only protect your domain from spoofing but also boost your domain's reputation. The result? Fewer emails flagged as spam and better delivery rates for your campaigns.
