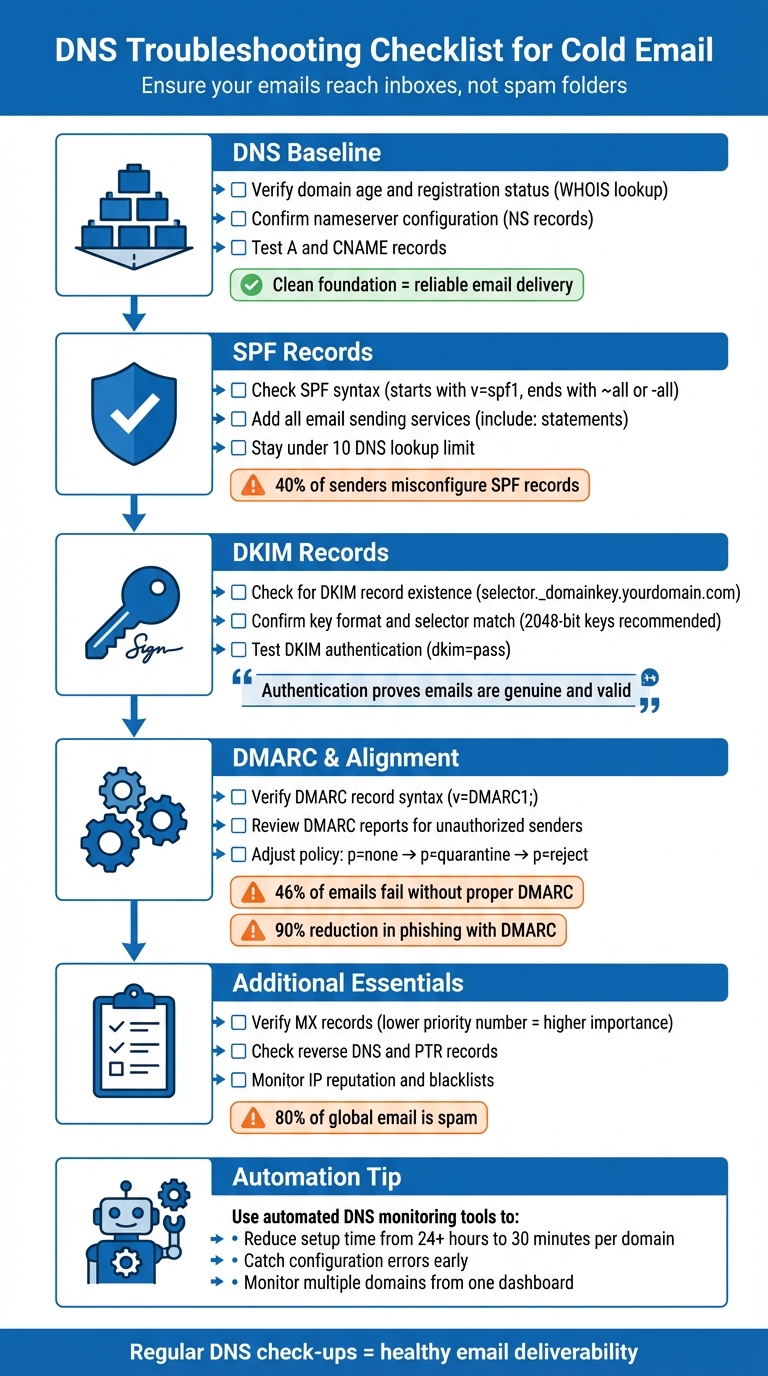
Your emails won’t land in inboxes if your DNS setup is wrong. This guide breaks down how to fix common DNS issues that impact email deliverability, like SPF, DKIM, and DMARC misconfigurations. Key takeaways:
p=none), fix alignment issues, and move to stricter policies like p=reject.Use DNS tools like MXToolbox or automated platforms like Primeforge to simplify setup and monitoring. Get your DNS right, and your emails are more likely to reach their destination.
DNS Troubleshooting Checklist for Cold Email Deliverability
Before diving into troubleshooting authentication records like SPF or DKIM, it’s smart to confirm that your domain's DNS setup is solid. Overlooking this step can lead to wasted effort fixing issues that might actually stem from a faulty DNS configuration. A proper DNS foundation ensures that any adjustments to SPF, DKIM, or DMARC records will work as intended. Here are three key steps to establish a strong baseline.
Start by confirming your domain is properly registered. A quick WHOIS lookup can provide details like the registration date, expiration date, and ownership information. Beyond this, check the domain's reputation history using tools such as Talos or MXToolbox to ensure it hasn’t been blacklisted or associated with spam in the past.
Log into your domain registrar’s DNS settings and verify that the assigned nameservers (NS records) point to the correct DNS provider. Consistency across all nameservers is critical. You can use command-line tools like nslookup (Windows) or dig (macOS/Linux) to query your domain's NS records directly. For a broader view, online tools like whatsmydns.net or DNSChecker.org can help you check global propagation.
Additionally, clean up outdated records like old MX, SPF, or NS entries, as these can cause conflicts. Lowering your TTL settings can speed up propagation for changes. To avoid disruptions, keep your old hosting active until DNS updates have fully propagated.
Ensure your root domain and subdomains (like send.domain.com) resolve correctly. Use tools such as dig or nslookup to confirm that A records point to valid IP addresses and that CNAME records are correctly linked to their targets.
If you’re managing multiple domains manually, there’s always a risk of typos or configuration errors. Automated tools like Primeforge can streamline the process, cutting setup time from over 24 hours per domain to just about 30 minutes. These tools also include built-in validation to catch errors early, helping maintain email deliverability. For teams handling multiple outreach domains, this efficiency can make a big difference in avoiding errors and ensuring scalability.
Once your DNS records are in order, you can confidently move on to tackling SPF, DKIM, and DMARC configurations.
Once you've confirmed your DNS setup, it's time to focus on your SPF (Sender Policy Framework) records. These records play a critical role in email authentication by telling receiving mail servers which IP addresses and services are allowed to send emails on behalf of your domain. Missteps in configuring SPF records can lead to failed authentication, causing emails to either end up in spam folders or be outright rejected. The most common culprits? Syntax errors, missing sending services, and exceeding the 10 DNS lookup limit.
Start by ensuring you have only one SPF record. Having multiple SPF records confuses mail servers and results in failed authentication. Use a tool like MXToolbox's SPF Record Lookup to confirm that your record begins with v=spf1 and ends with a qualifier, such as ~all (soft fail) or -all (hard fail). Within the record, mechanisms like include:, ip4:, or ip6: specify the authorized senders.
Be meticulous about avoiding typos or formatting errors. For instance, a record like v=spf1include:_spf.google.com~all (missing spaces) will fail completely. If you're using Google Workspace alone, your SPF record should look like this:
v=spf1 include:_spf.google.com ~all
For Microsoft 365, it would be:
v=spf1 include:spf.protection.outlook.com -all
Once you've verified the syntax, the next step is to ensure all authorized email services are included.
After confirming your record's format, list every email service you use, such as Google Workspace, Microsoft 365, Primeforge, or Mailchimp, by adding their respective include: statements. Missing even one of these services means emails sent through that platform will fail SPF authentication. For example, if you're using both Google Workspace and Mailchimp, your record should include:
include:_spf.google.com
include:servers.mcsv.net
Managing multiple domains with various email providers can make this process tedious and prone to errors. Tools like Primeforge can automate DNS configuration for platforms like Google Workspace and Microsoft 365, ensuring SPF records are properly formatted and include all necessary services from the start - no overlooked include: statements to jeopardize your email deliverability.
SPF records are limited to 10 DNS lookups. Each include:, a:, or mx: mechanism counts as one lookup, so hitting this limit can cause your SPF record to fail. To minimize lookups, consider replacing include: mechanisms with direct ip4: or ip6: entries whenever possible, as IP addresses don’t count toward the limit. You can also flatten SPF records to consolidate lookups or use tools designed to simplify nested records.
Here’s a quick breakdown of mechanisms and how they impact the lookup limit:
| Mechanism | Counts Toward Limit? | Best Use Case |
|---|---|---|
include: |
Yes | For third-party services (e.g., Google, Microsoft 365) |
ip4: / ip6: |
No | Use for fixed IP addresses to save lookups |
a: |
Yes | To authorize the domain's A record |
mx: |
Yes | To authorize the domain's MX records |
all |
No | Mandatory at the end of every record |
Let’s dive into DKIM records next. DKIM (DomainKeys Identified Mail) is all about attaching a digital signature to your emails, proving their integrity and confirming their origin. Dean Canellos, Former Manager of Deliverability Operations at Higher Logic, sums it up perfectly:
"Authentication is defined as 'the process or action of proving or showing something to be true, genuine, or valid.'"
If DKIM fails, your emails lose this layer of authentication, making them more likely to end up in spam folders or get rejected entirely.
First, confirm that your DKIM record exists. You’ll find it under selector._domainkey.yourdomain.com, where "selector" is the unique identifier tied to your email platform. For instance:
google._domainkeyselector1._domainkey or selector2._domainkeyUse DNS lookup tools like MXToolbox to check for the record. A valid DKIM record starts with v=DKIM1; followed by your public key. If you don’t see any results during the lookup, the record might not exist yet or hasn’t propagated. Tools like whatsmydns.net can help you check its visibility across the globe.
Make sure the DNS selector matches the one used by your email platform. Also, check that your key length meets the platform’s requirements. Most modern systems require 2048-bit keys, though older configurations might still use 1024-bit keys. If your DNS provider truncates the long public key string, you may need to break it into smaller parts or switch to a provider that supports longer TXT records.
| DKIM Issue | Description | Fix |
|---|---|---|
| Missing Selector | DNS lookup can’t locate the record at the specified host. | Double-check the host name is selector._domainkey (e.g., google._domainkey). |
| Inadequate Key Length | Key size doesn’t meet platform requirements (e.g., 1024 vs 2048). | Generate a new 2048-bit key in your admin console and update your DNS record. |
| Multiple Records | More than one TXT record exists for the same selector. | Remove any extra or outdated records, leaving only one valid TXT record per selector. |
| Truncated Record | The DNS provider cut off the long public key string. | Check if your provider needs TXT records split into multiple parts. |
Once your record is set up, test it. Send emails to tools like Mail-Tester or dkimvalidator.com. If the result shows dkim=pass, you’re good to go. If it shows dkim=fail or dkim=neutral, there might be issues like mismatched keys or syntax errors. You can also analyze email headers using tools like Google Messageheader or MailTested to identify any lingering problems.
For a hassle-free way to manage DNS records during your cold email campaigns, consider automated tools like Primeforge. They help ensure that critical records, including DKIM, stay correctly configured over time. Once DKIM is verified, you can move on to tackling DMARC and alignment issues.
DMARC brings SPF and DKIM together to show who is sending emails on your behalf. Without the right DMARC setup, 46% of emails fail to land in the recipient's inbox. Proper DMARC enforcement can cut phishing attempts by up to 90%.
To check your DMARC record, query _dmarc.yourdomain.com. A valid DMARC record begins with v=DMARC1; and includes a policy tag like p=none, p=quarantine, or p=reject.
| Tag | Default | Purpose |
|---|---|---|
| v | DMARC1 | Version; must always be the first tag in the record. |
| rua | none | Specifies where aggregate XML reports are sent (e.g., mailto:[email protected]). |
DMARC reports provide insights into which emails pass or fail authentication and help uncover unauthorized senders. Use tools designed for DMARC reporting to analyze this data effectively. Watch for patterns of misalignment - these often signal that third-party services are sending emails on your behalf without proper configuration.
For example, in November 2023, a SaaS client partnered with SalesHive to transition from a p=none to a p=reject policy over 90 days. By carefully analyzing DMARC reports and fixing alignment issues for legitimate traffic, they identified unauthorized sending sources and cut their spam complaint rate by 41%, all while improving their sender reputation.
Start with p=none to monitor email traffic without causing disruptions. Once you've resolved alignment issues, move to p=quarantine and eventually to p=reject for the highest level of security. As Mailgun explains:
"DMARC is not just a record, it's a process of organizing your email program to keep spoofers from impersonating you."
Take a close look at your alignment settings. If you're managing multiple domains for outreach campaigns, tools like Primeforge can automate DNS setup, including DMARC configuration, so you can focus on your campaigns instead of troubleshooting DNS records.
Once your DMARC is optimized, shift your attention to other key areas like MX records, reverse DNS, and IP reputation. These steps will further strengthen your email deliverability.
Once your SPF, DKIM, and DMARC records are in place, it’s time to review other DNS settings that can impact email deliverability. MX records, reverse DNS, and IP reputation are key factors to consider when optimizing your cold email strategy.
MX (Mail Exchange) records are essential for directing incoming emails to the correct mail server for your domain. Your Email Service Provider (ESP) will provide the necessary hostnames and priority values. Typically, lower priority numbers indicate higher importance. For instance, Google Workspace often assigns a priority of "1" to its primary server.
Even if your domain is send-only, having valid MX records is crucial. They show that your domain is legitimate and actively managed, which helps establish credibility.
Your sending IP address must have a valid PTR (pointer) record that resolves to a hostname matching your domain's EHLO/HELO identifier. This process, known as reverse DNS lookup, ensures that your IP is properly linked to a legitimate domain.
To check reverse DNS:
nslookup [your-ip]
dig -x [your-ip]
The returned hostname should align with your EHLO/HELO identifier. Without proper reverse DNS configuration, your emails are more likely to be flagged as spam. This is especially critical given that approximately 80% of global email traffic is spam.
Regularly run your sending IPs and domains through blacklist checkers like MultiRBL or Talos Intelligence. If you discover any blacklisting, follow the delisting instructions provided by the relevant service.
Your choice of IP infrastructure - shared or dedicated - also plays a role in reputation management. Shared IPs don’t require a warm-up period but offer limited control over reputation. Dedicated IPs, on the other hand, require a warm-up period of 2–6 weeks and typically cost $1–$5 per month per IP.
By combining these DNS verifications with proper authentication records, you can build a strong foundation for cold email success. For teams managing multiple domains, tools like Primeforge simplify the process by automating DNS setup and providing US-based IP addresses. This eliminates the need for manual configuration of MX records, PTR records, and other technical elements.
Strengthening these DNS components enhances your email infrastructure and boosts deliverability.
Relying on manual DNS checks can be time-consuming and prone to errors, especially when managing multiple domains. Automated DNS monitoring and management tools help identify issues early, ensuring they don’t disrupt email deliverability. By automating these processes, you can save time and reduce the risk of misconfigurations.
Automated DNS monitoring keeps an eye on critical records like SPF, DKIM, DMARC, MX, and PTR, sending alerts when changes occur. For example, you can configure high-priority alerts for significant issues, such as DMARC policy changes or unusual spikes in authentication failures in your DMARC reports. These changes could signal misconfigurations or even spoofing attempts.
When setting up alerts, include actionable steps to resolve issues. For instance, alerts should notify the right person, identify the DNS host, outline necessary tests, and provide clear instructions for fixes. Additionally, list all outreach domains and their email platforms, whether it’s Google Workspace, Microsoft 365, or another tool. Incorporating DMARC report analysis can also help you monitor alignment and track pass/fail trends over time, linking DNS issues to feedback from email providers.
Once automation is in place, centralizing DNS management becomes easier. A unified dashboard allows you to monitor DNS health across all your email domains in one place. You can track key metrics like SPF, DKIM, and DMARC authentication results, MX and A record resolutions, and PTR/reverse DNS consistency for your sending IPs. This streamlined view is particularly useful for agencies or teams managing multiple domains, enabling quick identification and resolution of domain-specific or provider-related issues.
To maintain consistency across domains, automate your DNS configuration processes. Tools like Primeforge simplify this by automatically generating SPF, DKIM, and DMARC records. These tools also support bulk DNS updates across multiple domains, ensuring that all configurations align with best practices. Primeforge, for instance, uses US-based IP addresses with properly configured PTR records, reducing the chance of manual errors. For larger setups, automated SPF flattening can help you stay within the 10 DNS lookup limit, avoiding silent SPF failures. By automating these steps, you can minimize errors and maintain reliable email authentication.
Effective DNS management plays a crucial role in ensuring strong email deliverability. Proper configuration, consistent monitoring, and automation are key components to keeping your emails out of spam folders and reaching their intended inboxes. With statistics showing that 19% of emails fail to make it to inboxes due to poor DNS setups and 40% of senders misconfiguring SPF or DKIM records, the importance of getting it right cannot be overstated.
Regular monitoring is essential to catch issues early, preserving your sender reputation and avoiding deliverability problems. Relying on manual DNS management across multiple domains not only consumes valuable time but also increases the risk of errors during record checks and troubleshooting. As Carin Slater, Manager of Lifecycle Email Marketing at Litmus, aptly puts it:
"Deliverability is a measure of the health of your email marketing program, so it's important to do regular check-ups on your domain, IP, and authentication in particular to make sure you're up-to-date".
To simplify this process and reduce the likelihood of errors, automated tools like Primeforge offer a game-changing solution. These tools handle DNS record creation, bulk updates across multiple domains, and continuous monitoring - all from one centralized dashboard. By automating these tasks, you can minimize configuration mistakes and dedicate more time to refining your outreach strategies.
Adopting proactive habits, such as rotating DKIM keys every six months and regularly reviewing DMARC reports, will help ensure consistent inbox placement and safeguard your domain's reputation over the long haul.
To stick to the 10 DNS lookup limit for SPF records, start by cleaning up your record. Remove any unused services and unnecessary default values that might be inflating the count. Be cautious with mechanisms like include, mx, a, or ptr, as they can quickly push you over the limit. Instead, opt for direct ip4 or ip6 entries whenever possible - they’re more efficient and help reduce lookups.
If you’re still over the limit, you might want to explore an SPF flattening service or a dynamic SPF policy. These tools can pre-resolve include mechanisms before you publish your record, ensuring you meet the lookup restrictions without sacrificing functionality. Keeping your SPF record lean and efficient is critical for maintaining reliable email deliverability, especially when running cold email campaigns.
Automating DNS setup is a fast and reliable way to boost email deliverability by ensuring essential records like SPF, DKIM, and DMARC are properly configured. Primeforge streamlines this process with its API-driven DNS automation, letting you add authentication records to your domains with just a single click. This not only saves you time but also reduces the risk of manual errors, allowing you to handle multiple domains in just minutes instead of hours.
With bulk DNS updates, Primeforge makes it easy to modify SPF, DKIM, or DMARC records across all your domains simultaneously. Plus, its DNS wizard automatically creates accurate record formats tailored for Google Workspace or Microsoft 365 mailboxes. These features set Primeforge apart from traditional manual setups or competitors that demand more effort and time, keeping your email campaigns running smoothly and protecting your sender reputation.
Monitoring DMARC reports plays a crucial role in spotting email spoofing attempts and identifying authentication problems. By analyzing these reports, you can adjust your DMARC policy - like transitioning from p=none to p=quarantine or p=reject - to strengthen email security, safeguard your brand, and boost email deliverability.
Consistently reviewing and tweaking your policy ensures your emails remain secure, land in the right inboxes, and help you prevent phishing attacks while maintaining your audience's trust.
