If your cold emails are landing in spam, your DNS setup might be the culprit. Properly configuring your DNS records - SPF, DKIM, and DMARC - can drastically improve email deliverability and protect your IP reputation. Here's what you need to know:
Misconfigurations are common - 40% of senders get SPF or DKIM wrong, and 75–80% struggle with DMARC. These errors can lead to high spam rates, delivery failures, and damage to your domain's reputation. Start with a DMARC policy set to p=none for monitoring, then move to stricter enforcement (p=quarantine or p=reject) once confident in your setup.
Why it matters:
For Microsoft 365, ensure you use the correct SPF, DKIM, and DMARC records and verify your domain through the admin center. Tools like Primeforge can automate this process, saving time and reducing errors.
Proper DNS configuration is key to ensuring your emails land in inboxes, not spam folders. Take the time to get it right, and you'll see better email deliverability and stronger campaign results.

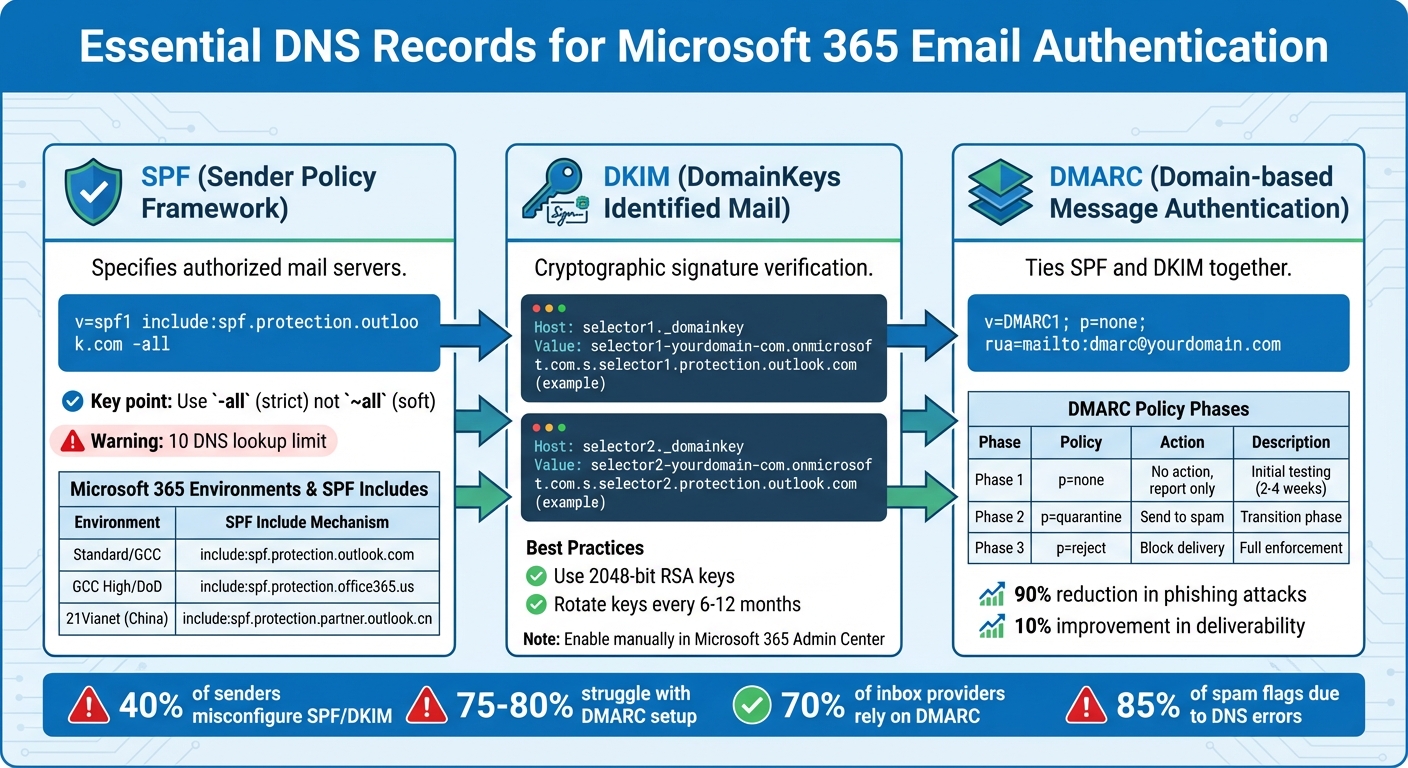
DNS Authentication Records Setup Guide for Microsoft 365 Email Deliverability
To ensure successful cold emailing with Microsoft 365, you need three essential DNS records: SPF, DKIM, and DMARC. These records work together to verify that your emails are legitimate and trustworthy.
Misconfigurations are common - 40% of senders get SPF/DKIM wrong, and a staggering 75–80% struggle with DMARC setup. Properly configuring these records is critical for maintaining your email deliverability and protecting your IP reputation.
The SPF (Sender Policy Framework) record specifies which mail servers are allowed to send emails on behalf of your domain. For Microsoft 365, you’ll need to add the following TXT record to your DNS:
v=spf1 include:spf.protection.outlook.com -all
-all directive enforces a strict policy, rejecting unauthorized emails. Avoid using ~all, which only flags suspicious emails without rejecting them.If your domain uses multiple email services, you must combine them into a single SPF record. For example:
v=spf1 include:spf.protection.outlook.com include:_spf.google.com -all
Keep in mind that SPF records are limited to 10 DNS lookups. Each include: statement counts as one lookup, and exceeding this limit will cause SPF authentication to fail.
| Environment | SPF Include Value |
|---|---|
| Standard / GCC | include:spf.protection.outlook.com |
| GCC High / DoD | include:spf.protection.office365.us |
| 21Vianet (China) | include:spf.protection.partner.outlook.cn |
DKIM (DomainKeys Identified Mail) adds a cryptographic signature to your emails, proving they haven’t been tampered with during delivery. Microsoft 365 requires you to create two CNAME records - selector1 and selector2 - to enable DKIM. Here’s what they typically look like:
selector1._domainkeyselector1-[domain-name]._domainkey.[domain].onmicrosoft.com
selector2._domainkeyselector2-[domain-name]._domainkey.[domain].onmicrosoft.com
Once you’ve added these records, you’ll need to enable DKIM manually in the Microsoft 365 Admin Center. Navigate to Exchange > Protection > DKIM and toggle it on. If the toggle isn’t available, you can enable DKIM through PowerShell commands.
As of May 2025, Microsoft has updated its DKIM record format for new custom domains. Be sure to use PowerShell to retrieve the correct CNAME values if needed.
DMARC (Domain-based Message Authentication, Reporting, and Conformance) ties SPF and DKIM together, instructing receiving servers on how to handle emails that fail authentication. To set up DMARC, create a TXT record at _dmarc.yourdomain.com with this format:
v=DMARC1; p=none; rua=mailto:[email protected]
p=none to collect reports and monitor email activity.p=quarantine to move suspicious emails to spam.p=reject to block unauthorized emails entirely."Implementing SPF, DKIM, and DMARC is the gold standard in email authentication." – DuoCircle
Organizations that enforce DMARC policies often see up to a 90% reduction in phishing attacks and a 10% improvement in email deliverability. With 3.1 billion spoofing emails sent daily, DMARC enforcement is no longer optional. Major email providers like Google and Yahoo actively check for it.
| Policy | Action on Failure | Recommended Phase |
|---|---|---|
p=none |
No action; report only | Initial testing/monitoring |
p=quarantine |
Send to spam/junk folder | Transition phase |
p=reject |
Block delivery entirely | Full enforcement |
To start routing emails through Microsoft 365, you’ll first need to verify that you own the domain. This can be done using a TXT record (preferred) or an MX record.
Here’s how: Log in to your DNS provider and access the DNS management console. Add a TXT record with the host set to @, then paste the value provided by Microsoft 365, which usually looks like MS=msXXXXXXXX. Set the TTL to 1 hour (3,600 seconds). Next, head to the Microsoft 365 Admin Center, navigate to Settings > Domains, and click Verify.
Once your domain is verified, you’ll have the option to let Microsoft update your nameservers automatically or manually configure the DNS records yourself. For those who want more control, manual configuration is often the preferred choice.
After verification, you’ll need to update your MX and CNAME records to ensure your email is routed through Microsoft 365.
The MX record ensures that incoming emails are directed to Microsoft 365 servers. Before setting up the new MX record, remove any existing MX records to avoid split delivery issues.
To configure the MX record:
@.[domain-com].mail.protection.outlook.com.*.mx.microsoft format.You’ll also need CNAME records for services like Autodiscover (used by Outlook) and SIP (used by Microsoft Teams).
autodiscover pointing to autodiscover.outlook.com.sip pointing to sipdir.online.lync.com.Here’s a quick reference table for the records:
| Record Type | Host/Name | Points to / Value | Priority | TTL |
|---|---|---|---|---|
| MX | @ | [domain-com].mail.protection.outlook.com |
0 | 3,600 |
| CNAME | autodiscover | autodiscover.outlook.com |
N/A | 3,600 |
| CNAME | sip | sipdir.online.lync.com |
N/A | 3,600 |
After making these updates, it’s important to confirm that the changes have propagated.
DNS updates usually take between 2 and 8 hours to propagate, though in rare cases, it may take up to 48 hours. To check the status, use a tool like DNS Checker (dnschecker.org). A green checkmark (✔️) confirms successful propagation, while a red cross (❌) means the record hasn’t gone live yet.
For manual verification, you can run the following commands:
nslookup -type=MX yourdomain.com to check your MX record.nslookup -type=TXT yourdomain.com to verify SPF and DMARC records.If updates don’t appear, clear your local DNS cache:
ipconfig /flushdnssudo killall -HUP mDNSResponder.To ensure your setup is working, send a test email to a Gmail account and inspect the "Show Original" headers. Look for spf=pass, dkim=pass, and dmarc=pass to confirm everything is configured correctly. For a more in-depth analysis, tools like MXToolbox can help you check SPF, DKIM, DMARC, and MX records all in one place.
Primeforge simplifies the process of setting up SPF, DKIM, and DMARC records for Microsoft 365 by automating the entire configuration. Forget about dealing with complicated syntax or worrying about costly mistakes. The platform handles everything, including provisioning Microsoft 365 mailboxes with dedicated US-based IPs, which improves email deliverability for US recipients. Once set up, all mailboxes are automatically verified through DNS, ensuring they’re ready to go. Even better, the entire setup - including domain registration, DNS record creation, and mailbox provisioning - is completed in about 30 minutes. That’s a huge time-saver compared to the 24+ hours it typically takes with manual methods.
"Primeforge takes care of all the technical deliverability details - SPF, DKIM, DMARC, domain warm-up, and DNS records - without me needing to touch anything." - Dominique W.
This streamlined automation offers a clear edge over traditional manual setups.
When you stack Primeforge against manual configuration, the advantages are hard to ignore. Primeforge not only speeds up the process but also reduces the chances of errors. It allows bulk management of authentication records across multiple domains using a centralized dashboard. Built-in validation checks catch issues before they can affect email deliverability. Plus, its multiple workspace feature ensures that each client’s infrastructure remains isolated, protecting the reputation of individual projects.
| Feature | Manual Microsoft 365 Setup | Primeforge Automated Setup |
|---|---|---|
| Setup Time | 24+ hours per domain | ~30 minutes |
| Technical Expertise Required | High (DNS/Admin knowledge needed) | Minimal (Fully automated) |
| Bulk Management | No (Each domain configured separately) | Yes (Centralized updates for multiple domains) |
| IP Addresses | Random/Shared geographic assignments | Dedicated US-based IPs |
| Error Risk | High (Prone to manual mistakes) | Low (Automated checks and validation) |
Primeforge pricing starts at $45 per month for 10 mailbox slots when billed monthly. Opt for annual billing at $38 per month, and you’ll effectively get two months free. Domain costs are separate, with .com domains priced at $14 per year. The platform integrates seamlessly with sending tools like Salesforge, Instantly, Smartlead, and Lemlist, and it even offers API access for custom integrations.
Primeforge also includes unique features like mailbox profile pictures, workspace isolation, and support for both Microsoft 365 and Google Workspace.
"For us, Primeforge became a reliable hub for automated communication at scale." - Yuri L., CTO
Getting your DNS setup right is key to improving email deliverability and protecting your domain’s reputation. Accurate DNS records ensure that protocols like SPF, DKIM, and DMARC can work together to authenticate your emails and guard against spoofing. These configurations are crucial - especially since 70% of inbox providers worldwide now use DMARC to filter messages. Without proper authentication, your emails are more likely to end up flagged as spam or fail to reach their destination.
To keep things running smoothly, make sure your SPF record doesn’t exceed the 10-lookup limit, as going over can trigger "PermError" failures. Start with a DMARC policy set to p=none to monitor email activity before moving to stricter enforcement. For outreach campaigns, consider using a dedicated domain (like a .co or .io variation) instead of your primary business domain to shield your main domain from potential issues. Aim to keep your spam rate below 0.3% - a critical benchmark for maintaining high deliverability rates.
Platforms like Primeforge simplify this process by automating configurations, cutting setup time from hours to minutes and reducing the chance of errors.
"Deliverability is a measure of the health of your email marketing program, so it's important to do regular check-ups on your domain, IP, and authentication... just like how we all go to the doctor each year."
- Carin Slater, Manager of Lifecycle Email Marketing, Litmus
These steps build on the foundation of your initial DNS setup, ensuring your email campaigns perform at their best.
Regular maintenance of your DNS records is just as important as the initial setup. Conduct monthly audits to catch any unexpected changes caused by provider migrations, new integrations, or even malicious attacks. Automated tools, like those from Primeforge, can help reduce manual errors and keep your DNS configuration solid. Rotate your DKIM keys every six months to maintain their cryptographic strength, and lower your TTL (Time to Live) values 24–48 hours before making changes to speed up propagation.
Be mindful of common pitfalls. For instance, domains should only have one SPF record - multiple records can cause issues. Also, remove any outdated MX records from old providers, as these can lead to lost emails. Consolidate all authorized sending services into a single SPF record, and double-check that your DKIM selector matches exactly what your sending platform specifies. It’s worth noting that 40% of senders have misconfigured SPF or DKIM records, so regular validation checks can save you from future headaches.
"An IP reputation is hard to build, easy to lose, and hard to regain."
- Rob Pellow, Digital Experience Director, Armadillo
Investing time in a well-maintained DNS setup pays off. In fact, email programs can deliver up to $36 in returns for every $1 spent, making these best practices a smart move for anyone serious about email outreach success.
SPF, DKIM, and DMARC work as a team to safeguard your domain and boost email deliverability. Here's how they each play their part:
By setting up these DNS records, you lower the risk of email spoofing, strengthen your domain’s reputation, and improve the chances of your Microsoft 365 emails reaching inboxes instead of getting flagged as spam.
When you're setting up DNS records for Microsoft 365, even small mistakes can mess with your IP reputation and disrupt email delivery. Here are some common issues to watch out for - and avoid:
mail.outlook.com. Make sure all CNAME and TXT records meet Microsoft’s latest requirements, especially for custom subdomains like autodiscover or sip.
A record instead of a CNAME) are easy mistakes to make when entering DNS settings manually.
Using automated tools like Primeforge can take the headache out of this process. Primeforge not only generates and validates SPF, DKIM, DMARC, MX, and CNAME records for Microsoft 365 but also cleans up outdated entries and supports bulk updates. While similar tools exist, Primeforge stands out by combining email infrastructure management with cold outreach features, offering an all-in-one solution to maintain DNS accuracy and safeguard your email reputation.
Primeforge simplifies DNS setup by automating the creation and publishing of essential authentication records like SPF, DKIM, and DMARC. When you add a new mailbox, it automatically identifies your domain registrar’s settings, generates the required DNS entries, and applies them with a single click. This eliminates tedious manual steps and minimizes the chances of errors.
It doesn’t stop there - Primeforge includes built-in validation to confirm that records are correctly configured and propagated before you start sending emails. Tasks like managing SPF limits, rotating DKIM keys, and updating DMARC policies are handled automatically. This ensures your IP reputation stays strong and aligns with email authentication best practices. The result? Quicker setups, consistent authentication across all domains, and better email deliverability for your campaigns.
