Scheduling an email should take 10 seconds.
But well… we’re talking about Outlook here… where figuring things out itself is a headache.
You know… when I first time I tried it, I spent way too long looking for a "Schedule Send" option that didn't exist in the version of Outlook I was using.
Turns out, Microsoft has like four different versions of Outlook, and the scheduling flow is slightly different in each one.
Classic desktop app? It's buried under "Delay Delivery."
New Outlook? They finally added a proper "Schedule Send" button. Web version? Different again. Mobile? Surprisingly straightforward.
So I put together this guide covering every version, so you don't have to guess which set of instructions actually applies to you.
Let's get into it.
This is probably the most common version people use, especially if you're accessing Outlook through a browser via Microsoft 365.
The good news – Microsoft actually made this one pretty intuitive.
Here's how to do it:
That's it. Your email will sit in the Drafts folder (in some versions) or a dedicated Scheduled folder until it's sent at the time you picked.
VERY Important Note: If you close the browser tab after scheduling, the email still goes out on time. Unlike the classic desktop app (which I'll get to), the web version handles scheduling server-side. So you don't need to keep anything open.
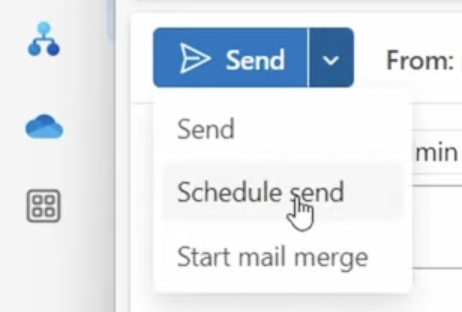
If you've recently updated Outlook on Windows, there's a good chance you're on the "New Outlook" version. Microsoft has been aggressively pushing this one, and honestly, the scheduling flow here is almost identical to the web version.
Here's how it works:

Now, how do you know if you're on "New Outlook" vs. the classic version?
Simple – look at the top-right corner of the app. If you see a toggle that says "Try the new Outlook" or "New Outlook", that tells you which version you're on.
If the toggle is switched on, you're on the new one.
One more thing: just like the web version, New Outlook handles scheduling on Microsoft's servers. So even if you shut down your computer after scheduling, the email still goes out on time. No need to keep the app running.
Pretty painless overall. The classic desktop version, though? That's where things get a little clunky.
Alright, this is the one that confuses people the most.
Classic Outlook (the older desktop app that's been around forever) doesn't have a clean "Schedule Send" button.
Instead, it uses something called "Delay Delivery", which does the same thing, just buried in a place you wouldn't naturally look.
Here's the step-by-step:

Here's the part that gets most people – the email doesn't actually leave right away.
It moves to your Outbox folder and sits there until the scheduled time. So far, so good.
But here's the catch.
Your computer needs to be on, and Outlook needs to be open for the email to actually send.
If you shut down your laptop or close Outlook before the scheduled time, the email just sits in the Outbox.
It won't go out until you open Outlook again, and at that point, it sends immediately, regardless of what time it is.
So if you're on Classic Outlook and you're scheduling something time-sensitive, make sure your machine stays on, and Outlook stays running.
Or better yet, consider switching to the web version or New Outlook, where scheduling is server-side and doesn't depend on your computer being awake.
Since the email sits in your Outbox, you can still make changes before it sends.
Simple enough – just don't forget it's there.
If you're on a Mac, the experience is actually pretty smooth now.
Microsoft updated Outlook for Mac a while back and added a proper Schedule Send option.
So… now you don't have to deal with the "Delay Delivery" workaround like on Classic Windows Outlook.
Here's how to do it:

The email will show up in a Scheduled folder in your sidebar. You can go there anytime to review, edit, or cancel upcoming emails before they send.
One thing worth mentioning – older versions of Outlook for Mac (pre-2021 updates) didn't have this feature natively.
If you're running an outdated version and can't find the Schedule Send option, updating the app should fix it. Just go to Help → Check for Updates and grab the latest version.
Also, same as the web and New Outlook, scheduling on Mac is server-side. You can close the app, shut down your Mac, and go take a nap. The email still goes out at the scheduled time. No Outbox drama like Classic Windows Outlook.
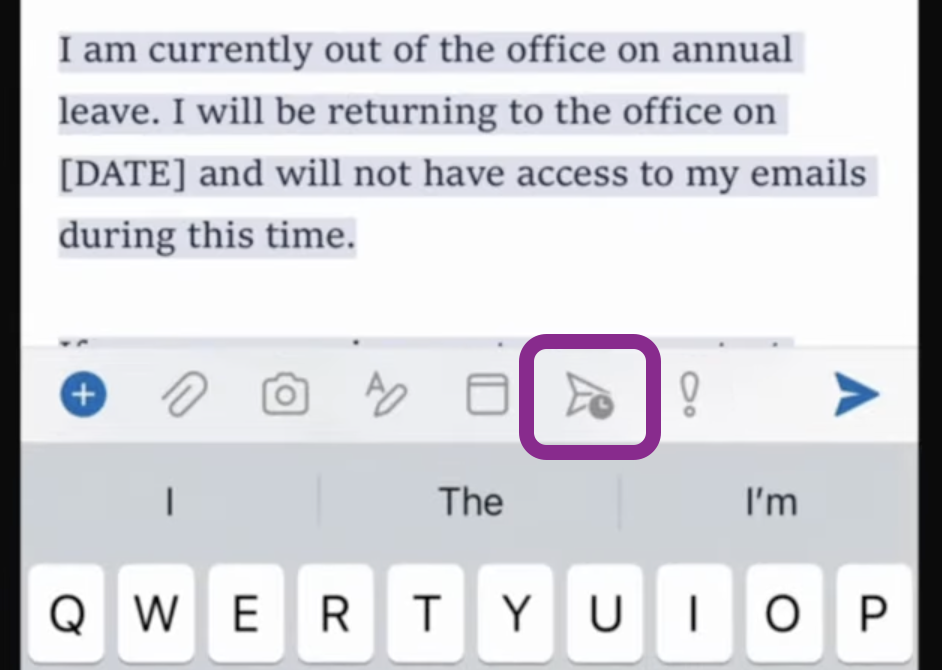
This one surprised me, honestly. I expected mobile to be stripped down, but Microsoft actually made scheduling on the Outlook mobile app really simple.
The flow is almost identical on both iOS and Android. Here's how:
That's literally it.
The scheduled email will appear in your Scheduled or Drafts folder depending on the app version. You can go back and edit or cancel it anytime before the send time.
A couple of things I noticed while using this:
By now you know how to schedule emails across every version of Outlook. But there are a few things that can trip you up if you're not paying attention.
I've run into most of these myself, so consider this a "learn from my mistakes" section.
I already mentioned this above, but it's worth repeating because it's the single biggest gotcha.
If you're on Classic Outlook (desktop), your computer needs to be on, and Outlook needs to be running for the email to actually send at the scheduled time. If either one is off, the email just sits in the Outbox and fires the moment you reopen Outlook.
Web, New Outlook, Mac, and Mobile all handle scheduling server-side, so this issue only applies to Classic.
Outlook schedules based on the time zone set in your account or device settings. If you're scheduling an email for a prospect in New York but your Outlook is set to IST or GMT, the email might land at a completely different time than you intended.
Before scheduling anything time-sensitive, double-check your time zone settings. In the web version, go to Settings → General → Language and time to confirm.
Good news – you can edit scheduled emails across all versions. Just find the email in your Scheduled folder (or Outbox in Classic Outlook), open it, make your changes, and reschedule or send it.
But here's a small thing – if you open a scheduled email in Classic Outlook's Outbox and hit Send again without resetting the delay, it might send immediately. So if you're editing in Classic, re-apply the Delay Delivery settings before closing.
This one catches a lot of people off guard. Outlook lets you schedule a single email to go out later, but there's no built-in option to schedule the same email to go out every Monday at 9 AM, for example.
If you need recurring scheduled emails, you'd have to either use Power Automate (Microsoft's automation tool) or look into a dedicated outreach platform that handles sequences for you.
Scheduling works the same whether your email has attachments or not. But if you're attaching large files, make sure you're not hitting Outlook's attachment size limit (25 MB for most accounts). The last thing you want is a scheduled email failing silently because the attachment was too big.
If you're scheduling one or two emails, Outlook's scheduling is perfect.
But if you're sending cold outreach to 50, 100, or 500 prospects, manually scheduling each email is not realistic.
You'll burn hours doing what a proper outreach tool handles automatically. On top of that, sending high volumes from a regular Outlook mailbox without proper warmup is a fast track to the spam folder.
I'll touch on this more in the next section.
Everything above works great for day-to-day emails.
But if you're doing cold outreach? Outlook's scheduling hits a wall fast.
No sequences. No automated follow-ups. No mailbox rotation. No personalization at scale.
And there's a bigger problem most people miss… Sending cold emails from the same Microsoft 365 mailbox you use for daily work is risky.
One spam complaint and your domain reputation tanks. That affects everything, not just outreach.
In such cases, it’s best to have dedicated Microsoft 365 mailboxes via a platform like Primeforge.
It has mailboxes with automated DNS and US IPs, ready in 30 minutes. No EDU tricks, no loopholes. Built for cold outreach deliverability, not daily use.
If you just need to schedule a few emails, the steps above have you covered. But if you're doing outbound at any real volume, separating your cold infrastructure from your daily inbox is the move.
Yes. Scheduling is available across all versions of Outlook – web, desktop (new and classic), Mac, and mobile. You don't need a premium Microsoft 365 subscription for this. Even a free Outlook.com account lets you schedule emails.
Absolutely. Find the email in your Scheduled folder (or Outbox if you're on Classic Outlook), open it, and make your changes. You can reschedule it, edit the content, or delete it entirely. Just make sure you do it before the scheduled send time.
Depends on the version. If you're using Classic Outlook (desktop), yes – your computer and Outlook both need to be running. If you're on the web version, New Outlook, Mac, or mobile, scheduling is handled server-side. So the email goes out even if your device is off.
Not natively. Outlook's schedule send feature only works for one-time emails. If you need to send the same email on a recurring basis (like every Monday at 9 AM), you'd have to set it up through Microsoft Power Automate or use a dedicated outreach tool that supports sequences.
For web, New Outlook, Mac, and mobile – nothing changes. The email is already queued on Microsoft's servers, so it sends regardless of your internet status. For Classic Outlook, the email sits in the Outbox and sends the next time Outlook connects to the internet, which may not be at your originally scheduled time.
Yes. Both the iOS and Android versions of the Outlook mobile app support “schedule send”. Tap the three-dot menu or long-press the Send button (varies by version), pick your time, and you're set.
